Just can't settle tonight...Feeling a bit anxious about tomorrow, I guess...thought I'd do a little catching up on some blogs I follow...leave some comments and get myself relaxed.
Thanks goodness I did, cuz I just found the greatest blog candy. http://craftindesertdivas.blogspot.ca/2012/09/500-follower-giveaway.html?showComment=1349054560133#c6456283012999944417
Craftin Desert Diva's are giving a $100.00 JoAnn's gift certificate when they reach 500 followers.
They are about 275 right now. I don't normally write a post about candy but that this was an exceptional one!
Good luck everyone!
Christmas Cards Made 2016


Sunday 30 September 2012
Wednesday 26 September 2012
WOYWW 173
Didn't think I would post this week...there is nothing creative on my desk...just work...boring work.
Well, not quite all boring...maybe we will start with the fun stuff.


All the junk on my desk is the leftover crap from sorting my craftroom. There used to be even one more box...it was full of tools and other weird stuff I found in my room, that should live in a garage. Into a box it went and yesterday it was carefully fitted into my newly organized garage. Yay!
Oh my, I nearly forgot the only other fun thing on my table. Look over on the front left of my desk. These cute little treat boxes came with a 12x12 card making kit I bought for Little Miss C (aka theponygirl06). $2.00 bought 8 cards, 8 envelopes, and 8 of these cute treat boxes.They are going to be delivered to her house Thursday when I walk her to school.
.
So now I am left with:
1. 2 frames to wire and hang.
2. Little acrylic bin of newly made cards to be placed in sleeves and sealed up with their matching envelopes.
3. One really tall package of doilies for scrapbook pages that are too damn tall to fit into my cupboards...drat!
4. Under the doilies are a zillion photo book sleeves that DH dragged home from his fathers house. Same problem as above...double drat.
5. One taupe rubbermaid bin is full of even more junk I found randomly placed in my room. They all belong in either my bedroom or my main bathroom. How they ended up in my room is beyond me...teehee
I'm going to claim that someone planted them!!!
6. Cardbord box on the far right holds my newspaper flyers. Yet another taupe rubbermaid bin is full of coupons already cut but waiting to be sorted and filed and black binder on top is where they should live.
Need to think of a better way to organize these as I am sick of them cluttering up my craft room. I love to coupon and save money but they are messy...
Ahhhhh...I have the solution...they should live in DH's office.. Yay...sorted!!!
7. Treat boxes to go to grandaughter.
Seriously, I have been sorting, organizing, purging and donating to the thrift shop off and on all summer. I have gone through every drawer and closet in my house...I have even sorted out the shed and the garage. DH helped and let me tell you, sometimes he was a bit of a hindrance. I quickly found out that his "let's get organized in preparation for downsizing" really meant let's downsize Scrappymo!'s stuff. LOL
My back surgery is in 5 days...once I am recovered (maybe in the spring) we want to downsize to a wee bit smaller house on a much smaller lot. A compact lot that doesn't require a ton of work all summer. We decided to get all the purging stuff done before Monday so that I can just concentrate on recovery and not fret about the work ahead.
So really, that puts these bits and bobs in perspective. OK, I'll start over:
1. Garage sorted and organized.
2. Shed sorted and organized
3. Whole house sorted and organized with the exception of 1 to 6 above.
Whew! That's better!!!
If you are reading this and wondering why I am showing my unfinished sorting projects, go to Julia's blog
http://stamping-ground.blogspot.ca/ and check it out. Make sure you leave her some bloggy hugs too!
Don't think you'll hear from me here for a few weeks...I'll miss all your creative rooms!.
Well, not quite all boring...maybe we will start with the fun stuff.
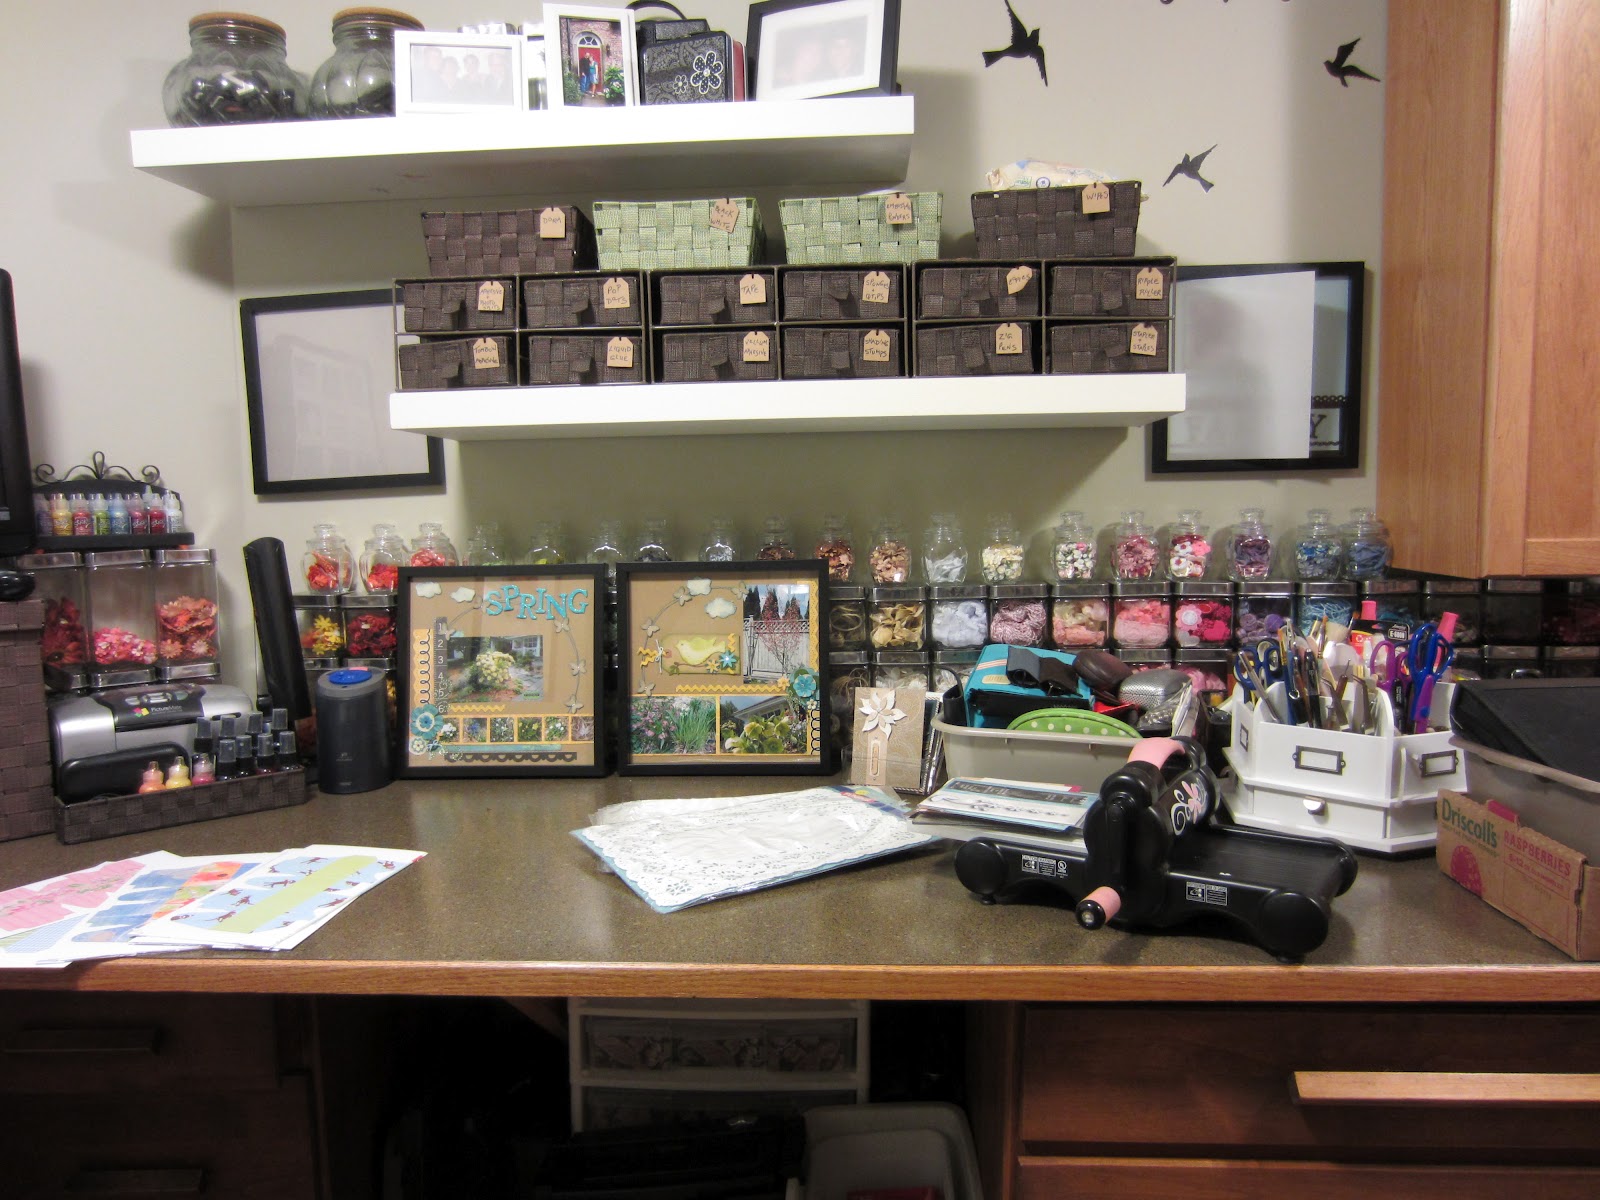
Last week I posted that I was working on getting something into frames that didn't contain pictures of the infamous, private people in my family. I am sick of having my frames covered up with paper so that faces are not caught in my photos when I snap my desk each week. I managed to find some layouts I did of my garden last spring. The colours are not too bad in my room...but my plan ground to a halt when I realized that I didn't have any picture wire in the house!
I've propped them up in front of the square embellishment jars...mostly so they don't get scratched...but also just to show them off! Hope to get out for the wire tomorrow.

All the junk on my desk is the leftover crap from sorting my craftroom. There used to be even one more box...it was full of tools and other weird stuff I found in my room, that should live in a garage. Into a box it went and yesterday it was carefully fitted into my newly organized garage. Yay!
Oh my, I nearly forgot the only other fun thing on my table. Look over on the front left of my desk. These cute little treat boxes came with a 12x12 card making kit I bought for Little Miss C (aka theponygirl06). $2.00 bought 8 cards, 8 envelopes, and 8 of these cute treat boxes.They are going to be delivered to her house Thursday when I walk her to school.
.

So now I am left with:
1. 2 frames to wire and hang.
2. Little acrylic bin of newly made cards to be placed in sleeves and sealed up with their matching envelopes.
3. One really tall package of doilies for scrapbook pages that are too damn tall to fit into my cupboards...drat!
4. Under the doilies are a zillion photo book sleeves that DH dragged home from his fathers house. Same problem as above...double drat.
5. One taupe rubbermaid bin is full of even more junk I found randomly placed in my room. They all belong in either my bedroom or my main bathroom. How they ended up in my room is beyond me...teehee
I'm going to claim that someone planted them!!!
6. Cardbord box on the far right holds my newspaper flyers. Yet another taupe rubbermaid bin is full of coupons already cut but waiting to be sorted and filed and black binder on top is where they should live.
Need to think of a better way to organize these as I am sick of them cluttering up my craft room. I love to coupon and save money but they are messy...
Ahhhhh...I have the solution...they should live in DH's office.. Yay...sorted!!!
7. Treat boxes to go to grandaughter.
Seriously, I have been sorting, organizing, purging and donating to the thrift shop off and on all summer. I have gone through every drawer and closet in my house...I have even sorted out the shed and the garage. DH helped and let me tell you, sometimes he was a bit of a hindrance. I quickly found out that his "let's get organized in preparation for downsizing" really meant let's downsize Scrappymo!'s stuff. LOL
My back surgery is in 5 days...once I am recovered (maybe in the spring) we want to downsize to a wee bit smaller house on a much smaller lot. A compact lot that doesn't require a ton of work all summer. We decided to get all the purging stuff done before Monday so that I can just concentrate on recovery and not fret about the work ahead.
So really, that puts these bits and bobs in perspective. OK, I'll start over:
1. Garage sorted and organized.
2. Shed sorted and organized
3. Whole house sorted and organized with the exception of 1 to 6 above.
Whew! That's better!!!
If you are reading this and wondering why I am showing my unfinished sorting projects, go to Julia's blog
http://stamping-ground.blogspot.ca/ and check it out. Make sure you leave her some bloggy hugs too!
Don't think you'll hear from me here for a few weeks...I'll miss all your creative rooms!.
Monday 24 September 2012
No poinsettias for me!
During the Christmas season, I can admire the poinsettias at the garden centers or in other peoples houses. I can appreciate their unique beauty and it is always interesting to look at the different colours and hybrids that are available.
But that is exactly where I like to see them...at places other than my own!
I don't like owning one. They look so warm and inviting and healthy when they arrive. Sometimes they have a shot of glimmer dust and are all sparkly and inviting. Well, at my house that first blush of beauty soon fades! Mine start wrinkling up their leaves shortly after arriving...let me tell you it is not a pretty site.
Quite quickly, they begin dropping their leaves. It then becomes a fight to keep them alive and frankly, I enjoy all the beauty of Christmas too much to spend it nursing something sickly. Nursing is probably a poor choice of words...you see mine never revive...I am the Nurse Rachet of poinsettias!!!
I purchase them to give as gifts to those that love them, treasure and let them live...holding them for those few moments from the store until we deliver them, is enough for me.
Invariably, someone gives us one at Christmas, some years we have been given 3! Usually the giver announces with a beaming smile "I got you a poinsettia, I know how you LOVE them". ahahahahaha
I like to keep my poinsettias to cards and those found in silk flower arrangements. In that spirit, here is my lastest Christmas card creation. My poinsettia is a new tricoloured hybrid, all glimmery in kraft, taupe and ivory. I used one of the shiny card bases that I mentioned in my last post. I don't mind this box of bases as the sheen is sort of embossed over the kraft and is not too offensive.
Here's the card assembled...
 I decided that it was a bit too plain looking...it is for Christmas after all...so I pulled out the stickles and some pearl bling and gave it a little more pizzaz!
 Card base - Michaels Recollections Kraft cards and envelopes
Ivory, taupe and kraft shimmery cardstock - Dollar Giant 6 inch paper packs (a couple of years ago)
Sentiment - TP Studio Christmas Greetings from Dollars and Sense ( I just used the word Peace from Peace On Earth) I turned the shimmery paper over as the sentiment would not stamp clearly on the textured shimmer side.
I am submitting this card to the following challenges:
1. Pixie's Crafty Workshop - use up your snippets http://pixiescraftyworkshop.blogspot.ca/
The snippets of shimmery cardstock were so small for this card that I had to cut each layer individually as the scraps of paper were only big enough for one of the layers each. Hence the tri-coloured flower. teehee
2. Rudolph Day http://stampingforpleasure.blogspot.co.uk/
3. Crafty Calender Challenge - browns and creams http://craftycalendarchallenge.blogspot.ca/
4. Holly Jolly Christmas - Sentiment only http://hollyjollychristmaschallenge.blogspot.ca/
5. Sparkles Christmas Challenge - sparkle and bling (I used stickles and pearl bling on this card) http://sparklesforumchristmaschallenge.blogspot.ca/
6. Going Buggy - non traditional Christmas colours http://going-buggy.blogspot.co.uk/2012/09/september-challenge.html
But that is exactly where I like to see them...at places other than my own!
I don't like owning one. They look so warm and inviting and healthy when they arrive. Sometimes they have a shot of glimmer dust and are all sparkly and inviting. Well, at my house that first blush of beauty soon fades! Mine start wrinkling up their leaves shortly after arriving...let me tell you it is not a pretty site.
Quite quickly, they begin dropping their leaves. It then becomes a fight to keep them alive and frankly, I enjoy all the beauty of Christmas too much to spend it nursing something sickly. Nursing is probably a poor choice of words...you see mine never revive...I am the Nurse Rachet of poinsettias!!!
I purchase them to give as gifts to those that love them, treasure and let them live...holding them for those few moments from the store until we deliver them, is enough for me.
Invariably, someone gives us one at Christmas, some years we have been given 3! Usually the giver announces with a beaming smile "I got you a poinsettia, I know how you LOVE them". ahahahahaha
I like to keep my poinsettias to cards and those found in silk flower arrangements. In that spirit, here is my lastest Christmas card creation. My poinsettia is a new tricoloured hybrid, all glimmery in kraft, taupe and ivory. I used one of the shiny card bases that I mentioned in my last post. I don't mind this box of bases as the sheen is sort of embossed over the kraft and is not too offensive.
Here's the card assembled...


Ivory, taupe and kraft shimmery cardstock - Dollar Giant 6 inch paper packs (a couple of years ago)
Sentiment - TP Studio Christmas Greetings from Dollars and Sense ( I just used the word Peace from Peace On Earth) I turned the shimmery paper over as the sentiment would not stamp clearly on the textured shimmer side.
I am submitting this card to the following challenges:
1. Pixie's Crafty Workshop - use up your snippets http://pixiescraftyworkshop.blogspot.ca/
The snippets of shimmery cardstock were so small for this card that I had to cut each layer individually as the scraps of paper were only big enough for one of the layers each. Hence the tri-coloured flower. teehee
2. Rudolph Day http://stampingforpleasure.blogspot.co.uk/
3. Crafty Calender Challenge - browns and creams http://craftycalendarchallenge.blogspot.ca/
4. Holly Jolly Christmas - Sentiment only http://hollyjollychristmaschallenge.blogspot.ca/
5. Sparkles Christmas Challenge - sparkle and bling (I used stickles and pearl bling on this card) http://sparklesforumchristmaschallenge.blogspot.ca/
6. Going Buggy - non traditional Christmas colours http://going-buggy.blogspot.co.uk/2012/09/september-challenge.html
Friday 21 September 2012
Another guy card for the stash
I'm on a roll with guy cards! Two in a row! Wow, so not like me.
I have been on a stash busting crusade for quite some time. My room is simply chock-a-block full of supplies. Now, don't get me wrong. It is not full to the gills with the latest and greatest...but it is full never the less. I figure once upon a time I loved these supplies enough to bring them home...so I'm on a mission to use them up.
While I have been reorganizing my room, I have pulled several 3D elements to use for what I call "quickie cards". I bought a little portable file complete with hanging file folders at the scrapbook garage sale. Best dollar purchase I made there.
 When I find an embellishment that I think would make a good card candidate, I throw it into one of the file folders. As I have continued to sort my room, I have thrown into that same folder any other bits and bobs that I think would go with. I threw in the piece of jute, the ship and the lighthouse first off. When I tidied up my paper bits, I threw in the blue and the kraft card stock snippets. I always have a supply of little, teensy baggies on hand. They were great to throw in a few brads and the charm.
When it came time to make this card, I just had to cut a wee piece of cheesecloth for the "net" by the anchor and choose a card base.
Now...I have a little secret to share...I have 4 shoe boxes full of card bases and I don't like most of them!!! They were on clearance and I bought them in the heat of the moment. One whole box are lovely colours and patterns but are not a heavy enough weight to make a layered card. Two more boxes seemed to be a nice heavy weight yet once I got them home I was disappointed to find out that they are sort of shiny on the outside.
Embracing the spirit of frugality, I have been trying to use them up. Sometimes I cover the heavy weight ones completely with patterned paper on the outside and then start to build my card. Other times, I opt to place my card mat just in from the edges...thereby showing as little of the shiny sheen as possible. Depending on the base cards pattern, sometimes this works.
Another option is gluing the lightweight cards right over the heavyweight ones...thereby creating one card...no trimming required.
Today I was trying to decide which shiny card to use and spied this chevron patterned card base. I remembered that someone has a challenge posted today that calls for a chevron pattern somewhere on your card....so....Chevron base card it is today!
 Down plopped my card mat and then...oh dear...now you can't see the chevron design anymore. Well, I think it still looks sort of right with this sea themed card. I have not added a sentiment yet as I want to wait until I know who it is going to. We have several friends with boats...a couple have even retired to the seaside...it will definitely go to one of them!

Here is a little close up of the 3D elements. The ship has 3 layers and the sails alternate between one and
three layers as well.

I am entering this card in the following challenges:
1. Pixies Crafty Workshop - use snippets http://pixiescraftyworkshop.blogspot.ca All the bits from my card are snippets. The lighthouse and the ship are left over from a sheet of 3D images from the dollar store
2.Oldie But A Goodie - show us your ribbons, use stash at least 6 mo old http://oldiebutagoodiechallenge.blogspot.ca/ (Everything on this card with the exception of the card base is over a year old.. The ribbon is the sea wave blue banner strip...it is the first time I have used it)
3. Hooked on Crafts - Cards for men http://hookedoncraftchallenges.blogspot.ca/
4.By The Cute And Girly - Boys/Men inspiration http://bythecuteandgirly.blogspot.ca/
5. Crafty Creations - Around The World #188 (my ship is sailing around the world) http://craftycreationschallenges.blogspot.ca/2012/09/challenge-188-around-world.html
6. For Fun Challenge - Guiding Lighthouse http://forfunchallenges.blogspot.ca/
7. Sisterhood Of Crafters - No stamps http://thesisterhoodofcrafters.blogspot.ca/
8. Bunny Zoe's Crafts Challenge - Distressing (The blue card base is sanded, nicked with scissors and inked/the kraft elements are heavily inked) http://bunnyzoescrafts.blogspot.co.uk/2012/09/challenge-28-distressing.html
9. Catered Crop - use a knot http://cateredcrop.com/ I knotted the anchor onto the fish netting with bakers twine...I also have 2 more hidden knots... I hand sewed the burlap onto the card base and tied a knot to start and finish that sewing.
I have been on a stash busting crusade for quite some time. My room is simply chock-a-block full of supplies. Now, don't get me wrong. It is not full to the gills with the latest and greatest...but it is full never the less. I figure once upon a time I loved these supplies enough to bring them home...so I'm on a mission to use them up.
While I have been reorganizing my room, I have pulled several 3D elements to use for what I call "quickie cards". I bought a little portable file complete with hanging file folders at the scrapbook garage sale. Best dollar purchase I made there.

When it came time to make this card, I just had to cut a wee piece of cheesecloth for the "net" by the anchor and choose a card base.
Now...I have a little secret to share...I have 4 shoe boxes full of card bases and I don't like most of them!!! They were on clearance and I bought them in the heat of the moment. One whole box are lovely colours and patterns but are not a heavy enough weight to make a layered card. Two more boxes seemed to be a nice heavy weight yet once I got them home I was disappointed to find out that they are sort of shiny on the outside.
Embracing the spirit of frugality, I have been trying to use them up. Sometimes I cover the heavy weight ones completely with patterned paper on the outside and then start to build my card. Other times, I opt to place my card mat just in from the edges...thereby showing as little of the shiny sheen as possible. Depending on the base cards pattern, sometimes this works.
Another option is gluing the lightweight cards right over the heavyweight ones...thereby creating one card...no trimming required.
Today I was trying to decide which shiny card to use and spied this chevron patterned card base. I remembered that someone has a challenge posted today that calls for a chevron pattern somewhere on your card....so....Chevron base card it is today!


three layers as well.

I am entering this card in the following challenges:
1. Pixies Crafty Workshop - use snippets http://pixiescraftyworkshop.blogspot.ca All the bits from my card are snippets. The lighthouse and the ship are left over from a sheet of 3D images from the dollar store
2.Oldie But A Goodie - show us your ribbons, use stash at least 6 mo old http://oldiebutagoodiechallenge.blogspot.ca/ (Everything on this card with the exception of the card base is over a year old.. The ribbon is the sea wave blue banner strip...it is the first time I have used it)
3. Hooked on Crafts - Cards for men http://hookedoncraftchallenges.blogspot.ca/
4.By The Cute And Girly - Boys/Men inspiration http://bythecuteandgirly.blogspot.ca/
5. Crafty Creations - Around The World #188 (my ship is sailing around the world) http://craftycreationschallenges.blogspot.ca/2012/09/challenge-188-around-world.html
6. For Fun Challenge - Guiding Lighthouse http://forfunchallenges.blogspot.ca/
7. Sisterhood Of Crafters - No stamps http://thesisterhoodofcrafters.blogspot.ca/
8. Bunny Zoe's Crafts Challenge - Distressing (The blue card base is sanded, nicked with scissors and inked/the kraft elements are heavily inked) http://bunnyzoescrafts.blogspot.co.uk/2012/09/challenge-28-distressing.html
9. Catered Crop - use a knot http://cateredcrop.com/ I knotted the anchor onto the fish netting with bakers twine...I also have 2 more hidden knots... I hand sewed the burlap onto the card base and tied a knot to start and finish that sewing.
Wednesday 19 September 2012
Birthday card!
Here's another birthday card for the stash drawer. I think it will make a good masculine card. I never have enough guy cards in my drawer. My girls will come to raid my stash with a list of all the birthdays they have coming up that month! Married daughter (Domestic Diva) has a huge circle of couples friends...of course they all have families now too. They do group get togethers for all the birthdays. That is a lot of cards and gifts so if I can provide a card from my stash it helps out!
I like the bit of a grungy look this card has going. It was fun to ink the over the embossed portions of the card. I had to use a stamp finger stick as you had to rub to get the ink into the low bits.

Off to make a card for Glamour Girl. She is off in Southern France, studying French language...and visiting a special fellow in Monaco! She was away on a trip around the world for 5 months, home for less then 2 months and now off to France for 2 months again. Her life is so exciting! She teaches at University and will benefit from having a second language, especially Canada's official second language.
Now to search for my Eiffel Tower stamp...
I am entering this birthday card in the following challenges:
1. Creative Card Challenges - Anything Goes http://creativecraftchallenges2.blogspot.ca/
2. Scrap Creations - Embossing http://scrap-creations1.blogspot.ca/
3. Shopping Our Stash - Emboss It #69 http://shoppingourstash.blogspot.ca/
4. Through The Craftroom Door - Anything Goes #36 http://www.craftdoormagazine.com/
5. Bunny Zoe's Crafts - Distressing http://bunnyzoescrafts.blogspot.co.uk/2012/09/challenge-28-distressing.htmlb
6. By the cute and girly - boys/ men http://www.bythecuteandgirly.blogspot.co.uk/2012/09/boysmen-september-challenge-over-at-by.html
7. Ladybug Crafts - Anything Goes http://ladybugcrafts.blogspot.ca/2012/09/first-challenge-anything-goes-o.html
8. Hooked on Crafts - Cards for Men http://hookedoncraftchallenges.blogspot.ca/
Tuesday 18 September 2012
Christmas greetings - Oh no, I wrecked it!

I have been trying to add a few more Christmas cards to my stash. While I like the overall design of this one, I was disappointed in my stamping of the verse. I stamped it out and smeared it, I turned the paper over and restamped it and as you can see, the word Christmas is sort of paler looking on the left hand side.
I did not have another piece of the matching paper so I stuck it on my card anyway.
That was a hard thing for me to do and I justified it by telling myself that only a card maker would notice ...Note to self to mail this one to a non cardmaker!!! teehee
The whole last usable scrap dilemna made me wonder what other card makers do when facing the same problem?
If you are down to your last scrap of matching paper and somehow manage to stamp your finishing details with a wee error...do you
1. set it aside and eventually check all over to try to find the matching paper
2. switch out the original paper and use a different colour with a perfect restamped text
3. throw caution to the wind and stick it on anyway?
Normally, I would chose option #1 but in the interests of getting a few more Xmas cards completed before my surgery, I opted for option #3...but as you can tell, I am not yet comfortable with my choice!!!
Should be fun to see the answers!
I am entering my card in the following challenges:
1. Stamp and Create Challenge http://stampandcreateblog.blogspot.ca/search/label/Challenge - Anything goes
2. Stampin' for the Weekend http://stampinfortheweekend.blogspot.ca/ Starting Christmas Early
3. Cute card Thursday http://cutecardthursday.blogspot.ca/ Christmas in September
4. Crimbo Crackers http://crimbo-crackers.blogspot.ca/ challenge #24 Vintage
5. Christmas Crafting http://christmascrafting.blogspot.ca/ challenge #14 Traditional colours
6. Holly Jolly Christmas http://hollyjollychristmaschallenge.blogspot.ca/ Sentiment only
Wednesday 12 September 2012
It's the little things you say and do
Glamour girl gave us a fabulous gift for Christmas...tickets to the Arts Club Theatre. We had a choice of various performances at their 3 venues during the season. It was such a perfect gift...DH loves live theater!
Then our world changed in March and the tickets lay forgotten...and almost expired.
Luckily, Glamour Girl started to remind me that the season would soon be ending. I managed to book us tickets to the last evening show of The Buddy Holly Story at the Stanley. We have always enjoyed dancing to his music in the past and looked forward to our evening out. We got all dressed up...I even wore a new dress and shrug, and fancy shoes too...no small feat for a woman with back problems. DH looked smart in black dress pants and a crisp shirt and tie.
We made reservations for supper at Monks. We sat and enjoyed our dinner and gorgeous water views of False Creek. It was fun to view the city from that angle. Glamour Girl lives beside the water...she can walk to South Granville area or Kits or Granville Island...that is just part of her everyday life. To us, the views are a treat!

These rowers were out on the water and it reminded me of when Glamour Girl rowed on a Dragon Boat Team in False Creek. Alas there were not any dragon boaters out that evening...sorry!

The aqua buses were busy transporting people back and forth from the city across False Creek. There is a stop right at Monks.


G
Just as we were leaving, an aqua bus pulled up to the Monk's dock and this Bride and Groom got off!
I got a quick picture before we headed out to meet up with the valet. There was a bit of a delay in bringing back our car, so we rushed straight off to the theater.

DH managed to find a parking lot about a block from the theater. That is about my limit for walking without something to lean on at the moment, so that was so thoughtful of him. As we turned the corner to approach the Stanley, lo and behold, the photographer was doing PR pictures out front. They were nice enough to motion to me to feel free to take some pictures too.


The play was so fabulous. Zachary Stevenson was a great Buddy Holly. His voice is just superb. The resemblance to Buddy Holly's voice is uncanny. He has played Buddy for several years for various different theater groups across Canada. Not bad for a boy from Victoria!
In tribute to my DH, who has struggled so much with his health in 2012, I leave you with a snippet of a different sort...a snippet of my favourite Buddy Holly song...Rave On
Well, the little things you say and do, make me want to be with you
Rave on, it's a crazy feeling and I know it's got me reelin'
When you say, I love you
Rave On
Tuesday 11 September 2012
WOYWW 171
It's time for a gander at all the crafty workdesks around the world Thse sneak peeks can be found at the lovely Julia Dunnitt's blog http://stamping-ground.blogspot.ca/ Stop in and leave her a comment and then go on to check out all the creative desks.
My desk is looking a little bare but don't let that fool you. I have been cleaning and reorganizing the set up of my room. I have been working on the redo for several weeks...but got slowed down with the tedious sorting that accompanies such tasks.
My back surgery is finally confirmed for Oct 1st. This is such great news as I am fed up with being slowed down. I am tired of being in pain all the time and look forward to this journey to regain my "old life". I'll be in hospital 3 to 6 days and then 6-8 weeks of recovering. I will be up and walking that first day!
So I am busy changing up my room as I won't be able to bend or lift for several weeks. I have placed 8 shoe boxes along the right side of my counter...the side I rarely show you as it is always piled high with stuff to be filed! Considering that this space is supposed to a spot for guests to work at, it seems fitting that I have finally cleared it off!
I have filed away all that, and more...and I have filled 2 shoe boxes with the bits and bobs for the wedding album I have been working on. I plan to have the iris box with the card stock and patterned paper for the wedding pages sitting out over there as well.
2 more shoe boxes are full of Xmas bits and bobs as I hope to churn out some Xmas cards.
 The big brown woven basket is full of cardstock and patterned paper Xmas themed. I even have a set of photos of last years Xmas tree and Xmas decorating...so may be I can get a couple of Xmas layouts polished off as well.

Lastly I leave you with my ribbon masterpiece. I used to roll my ribbon and store it in jars on my counter. You can still see a few jars full of rolled ribbon on the counter that I have not ironed yet...as I have run out of the tag holders:(

It isn't working out for me as I can't read the words on printed ribbon, nor see the whole pattern on some printed ones. So I spent hours unrolling it, ironing each piece and then weaving it through ribbon tags.
I sorted by themes and the remainder by colour. For now, I have stored all the tags on shower curtain hooks as I had an unused set. I am going to hang them all on cup hooks installed just above eye level on the closet wall under the stairs. That closet is accessed from my scrapbook room and already is used for scrapbook storage. They will fit in there quite nicely. When I need some ribbon, I will just grab the colour ring that I need and bring it to my desk to fine tune selecting which particular ribbon to choose.
 By next week I hope to have layouts of my garden in those frames up on the wall. Then I won't have to tape paper over the people in the photos every time I want to take a picture of my counter...lol
See you next week!
My desk is looking a little bare but don't let that fool you. I have been cleaning and reorganizing the set up of my room. I have been working on the redo for several weeks...but got slowed down with the tedious sorting that accompanies such tasks.
My back surgery is finally confirmed for Oct 1st. This is such great news as I am fed up with being slowed down. I am tired of being in pain all the time and look forward to this journey to regain my "old life". I'll be in hospital 3 to 6 days and then 6-8 weeks of recovering. I will be up and walking that first day!
So I am busy changing up my room as I won't be able to bend or lift for several weeks. I have placed 8 shoe boxes along the right side of my counter...the side I rarely show you as it is always piled high with stuff to be filed! Considering that this space is supposed to a spot for guests to work at, it seems fitting that I have finally cleared it off!
I have filed away all that, and more...and I have filled 2 shoe boxes with the bits and bobs for the wedding album I have been working on. I plan to have the iris box with the card stock and patterned paper for the wedding pages sitting out over there as well.
2 more shoe boxes are full of Xmas bits and bobs as I hope to churn out some Xmas cards.


Lastly I leave you with my ribbon masterpiece. I used to roll my ribbon and store it in jars on my counter. You can still see a few jars full of rolled ribbon on the counter that I have not ironed yet...as I have run out of the tag holders:(

It isn't working out for me as I can't read the words on printed ribbon, nor see the whole pattern on some printed ones. So I spent hours unrolling it, ironing each piece and then weaving it through ribbon tags.
I sorted by themes and the remainder by colour. For now, I have stored all the tags on shower curtain hooks as I had an unused set. I am going to hang them all on cup hooks installed just above eye level on the closet wall under the stairs. That closet is accessed from my scrapbook room and already is used for scrapbook storage. They will fit in there quite nicely. When I need some ribbon, I will just grab the colour ring that I need and bring it to my desk to fine tune selecting which particular ribbon to choose.

See you next week!
Subscribe to:
Posts (Atom)